PowerMate Care and Feeding

Powermate (68 / 365)
That soothing blue glow

Every now and again I’ll get an email at work asking for documentation, or sample code demonstrating how to communicate with the PowerMate. Generally, I’ll send out some sample code (taking the time to create a sample if I can’t recall where I stashed it the last time), and make a mental note to come up with a better solution someday. My mental notes seem to be written in invisible ink.

Well this time around, I went through “proper channels” to find out if it would be okay to post this information publicly. Somewhere to make it easier for folks to find, and Griffin has been kind enough to give me permission to do just that. If you’re looking for sample code to discover, receive data from, and control a PowerMate, your in luck because I’ve created a repository on github called PMDemo to demostrate just that, and you can find it here:

http://github.com/somegeekintn/PMDemo

You might also take a look if you’re just generally interested in the IOKit, HID devices (that’s redundant), and what not.

And speaking of the PowerMate, version 3.0 will be wrapping up soon (I think), but we’re making room for another batch of beta testers. If you’re interested, the only requirements are that you:

  • have a PowerMate.
  • are running Snow Leopard.
  • are willing to write this email address and tell me you’re interested in beta testing the new PowerMate software.

If this is you, give me a holler, and I’ll hook you up. I really think…hope… thope. I thope you’ll like it.

Photographer at Large

Yesterday I got an message from someone representing HGTV.com, requesting permission to use one of my photos in a slide show they are creating for that site. I’ve made all of my photos available under the Creative Commons Attribution license so anyone is free to use them however they like, so long as I’m credited. Still, it’s always nice to receive some notice.

Unless I’m contacted, I usually won’t find out that one of my photos is being used somewhere unless I happen to notice an unusual spike in the number of views a photo is getting. That’s what happened when Skype used one of my photos in a blog post last summer.

Of course, now that I’ve completed my Project 365, I’m no longer watching my photo statistics very closely. Nor am I uploading many photos (although I think about dusting of my D40 more and more often). Anyway, I started to wonder where else my photos might be showing up on the interwebs. Here’s a sample of what I found:

There’s a bunch more, but you get the idea. It’s pretty cool that people like my photos enough to use them like this. If you want to use one of photos, be my guest, I love it! And if you want to let me know you’ll be using one of my photos, that’s even better!

Perspective

I was watching the news last night, which is odd because I almost never watch the news. Anyway, there was a story about these two golfing buddies. These guys were out golfing and buddy number one steps up to a par 3 and aces it. Hole-in-one. Buddy number two, not to be outdone, knocks in a hole-in-one for himself. Back to back holes-in-one. Pretty amazing.

Back in the studio the news folks are chatting about this. News guy one says Golf Digest (or someone) calculated the odds of back to back holes-in-one at 1 in 17,000,000. News guy two says “Wow! You’d have an easier time winning the lottery”. I call news guy two an idiot. No. No you would not have an easier time winning the lottery.

I assume we’re talking about the jackpot here of course. Maybe the reporter was talking about winning anything at all. Like a dollar to buy another lottery ticket with, in which case you have my apologies news guys number two. But if we’re talking about winning the Powerball, for example, the odds of winning the grand prize is 1 in 195,249,054.

I knew it was somewhere around there having looked this up just a few days ago, but it made me think: you are ten times more likely make back to back holes-in-one than you are to win the lottery. Those are some pretty long odds.

Top’s Up

In Context
Getting closer!

Work continues, albeit slowly, on my built-in bookcase project. Last weekend I got the top up and the lighting installed. I used low profile xenon lights from Rockler and they turned out really well. Super easy to install. The rest of the top, not so much. There were lots of mistakes there, but fortunately, easy to cover up and those that weren’t will be covered by the crown moulding.

There are some visible gaps in the center section on the top panel. That piece just rests there, allowing me access to the wiring / transformer for the lights if needed, so there isn’t any way I can think of to get it to rest flat. Maybe something will come to me.

Also, the computer monitor is absolutely swallowed by the the compartment that it rests in. I may just have to go look for something a little bigger. Bummer 🙂

Other than those minor things, I’m really happy with it. Now on to the moulding, doors, and the search to find a chair that looks like it actually belongs!

What Am I Doing Now?

Last year was the year of photography with my Project 365. This year I’m turning my attention to my home. I’ve kind of ignored it for a while, I suppose. Just living here and not paying too much attention to making many improvements, unless they were forced upon me. It’s been easy, over the years with all my various distractions, to turn a blind eye to some things that I really should have addressed sooner.

For example, for the longest time all of our A/V gear was stacked on an end table with video cassettes (have to find some way to use those things these days) between various components to provide room to breathe. Buying an entertainment center was always in the back of my mind, but I just kept putting it off for one reason or another.

Well, I finally decided enough is enough. My plan is to go through my house room by room and give each a makeover of some kind. There is a lot of making over that needs to be done, so this year we’ll probably just stick to the ground floor.

First up was the living room. Unfortunately, the living room is probably the one in the most desperate need of help. All of the furniture was either really old, or cheap or both. It was also dominated by a 57″ rear project television set. That set was flanked by the A/V gear I mentioned above, and one of those cheap particleboard bookcases you might get at Wal-Mart. This was filled with a few books, but mostly video games and movies. There was also a CD stand over in the corner filled with CDs. Also in that area was a “toy basket” that my kids use, but more often used by kids that my wife watches from time to time. Along the opposite wall is a computer armoire with the same kind of construction as the bookshelf. Not only is there a computer there, but some other odds and ends.

What I wanted to do was hide most of this stuff in cabinets and generally make the living room look a little less cluttered. As I thought about it, I decided a proper entertainment center would go a long way towards providing a home for the movies, games, and A/V gear. So, we finally broke down and purchased a lovely entertainment center and clear out a lot of clutter. But there was still the computer to consider. It occurred to me I could probably build a set of cabinets / bookcase / computer desk along the wall where the old television set used to be and still not have it take up as much room. In addition I could take books and items from the upstairs bookcase and move them downstairs, freeing up some room in the bedroom.
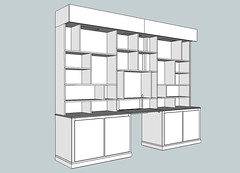
SketchUp
Bookcase from hell

After much thought, I came up with a design (using Google SketchUp) for a bookcase that would provide some storage space for the things I’d like hidden away, as well as the computer and provide shelves for some books as well as various decorative items. It was going to be pretty enormous. Ten feet long and stretching from floor to ceiling. I was going to make it all from MDF, paint it white to match the molding and transition border round the top of the living room, and add matching crown molding and baseboards to make it look truly built in.

I figured it would take a few weeks.

I was spectacularly wrong.

I’ve been working on this bookcase for… ever. I don’t even know when I started. I just know that it goes on and on. A lot of this has to do with my make nearly complete lack of experience. I built some rolling cabinets for the garage a couple years back, but that was nothing compared to this. There are about 100 pieces in my design. It may not be obvious at first, but besides the various sized shelves and dividers, I also built in channels to hide cords for the computer equipment and lighting. In addition, to provide strength and help with alignment, all the side and back panels have dados cut in them. And there are some corners that were rounded overs, and and ogee cut along the desk surface… It’s just a ton of work.

I’m probably about two thirds done.

The cabinets are done. And most of the shelving. I just have a couple pieces to work on there. Next up is the top section and the lights. Then the molding and baseboards (and I get to learn about coping joints), then finally the cabinet doors where I’ll learn how to make raised panel doors.

So that’s my project these days. I’ve created set on flickr with a few pictures of the project. I’ll try and post more as I move further along. One day, hopefully before I die. It will all be done. Then I can relax and admire my handiwork for a bit.

Then move on to the dining room.