My Son, the Playwright

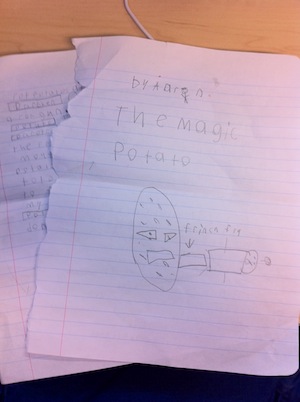
My son is eleven. He wrote a play. I’d like to share it with you here.

The Magic Potato

by Aaron

The Magic Potato
Original draft

Criminal: Finally! I have the magic potato and its power. No one can stop me!
Potato: Hey, where am I?
Criminal: No! He woke up!
The potato spit fries at the criminal to make him unconscious.
Me: Hey, a potato!
Potato: No, don’t eat me!
Me: Wow, a talking potato! Why are you here?
Potato: To stop evil! You see, the evil Doctor Rotten wants to rot every potato and no potatoes means no potato chips, no french fries, and most important, no potatoes!
Me: But I love potatoes!
Potato: Then let’s get to that lair in my jet.
Dr. Rotten: You’re too late!
Potato: Hey, you said you would rot potatoes at 11:30!
Dr. Rotten: Oh well. I have a rot gun!
Potato: TASTE TATER, HATER!
Dr. Rotten: What? What?!
Then the french fry went in Doctor Rotten’s mouth
Dr. Rotten: I never once tasted potatoes. Now I don’t want to do evil, but I want to farm! From now on my name is Doctor Spud!
Potato: Another job well done!

Updating Localized Nibs

This is probably common knowledge, but I’m writing this down here for my own benefit as much as anyone else. And maybe there’s a better way to do this, but this is what I’m doing.

We’ve been sort of hit and miss when it comes to localizing our apps over at Griffin, but we’re getting much better as of late, which is awesome. What’s not so awesome is replicating fifty-eleven changes to fifty-eleven localized nibs manually.

It turns out there is command line tool called ibtool that can help. You’ll need to provide the modified nib, the original version, the localized nib that you wish to update and someplace to write the new localized version to. Or you can just write it in place.

The first step is to grab a copy of the nib before it was modified. We use git, so I did something like this:

git cat-file blob HEAD:en.lproj/MyNib.xib > en.lproj/MyNib_original.xib

Now that we have a copy of the original, we can use nib tool to update a localized version like this:

ibtool --previous-file en.lproj/MyNib_original.xib --incremental-file en.lproj/MyNib.xib \
--localize-incremental --write de.lproj/MyNib_new.xib de.lproj/MyNib.xib

Just do that for each nib you’ve localized and you should be all set. Much less tedious and error-prone than replicating changes to your localized nibs manually.

Triple and a Full Dismount

This year’s thing for me is golf. I’ve played off and on through the years but have only made half-hearted attempts to get good at the game. Well this time around I’m putting forth real effort. And, as I tend to do, I have thrown myself headlong into learning, or trying to learn. For some people, golf comes naturally. I hate those people.

This all got started in late May. I visited my Dad for his birthday and we went and played a round of golf. I enjoyed it thoroughly and as I made my way back home wondered way I don’t play more often. I talked to my wife and about a month later we finally scheduled a tee time and started trying to play regularly. So I’ve been at this about two months. I’m still pretty terrible, but I’m making progress. I think. The first round I recorded at golfshot on 7/15 was a 95. This weekend I shot a 98. I seem to be going backwards. But it feels like I’m getting better. Ah well.

Hole #12 kind of sums up the sort of things I need to work on to get to the next level of play. It’s a 308 yard par 4. Basically straight away with a bunker left and right along the fairway. My tee shot was a straight 240 yard shot down the right hand side of the fairway. My wife also hit a nice tee shot which came to rest along the right hand side of the fairway.

Interlude:

We hopped in the golf cart and proceeded to head down to play our second. Her ball was on the other side of a mound on our left and I decided to abruptly cut hard left in front of the mound rather than go around it. At was at this point I noticed my wife exit the golf cart, seemingly in slow motion trying to figure out which way to fall when she hit the ground I guess. I can’t really say I was just so stunned. Is my wife about to go flying out of the golf cart? She landed, tucked into a sort of roll, and settled face down on the golf course. Yep. I’ve killed my wife. No wait. As I got the cart stopped and ran over to her I could see she was convulsing… oh dear God… with laughter. Oh that’s better, she’s okay. Since she was clearly okay, my next thought was to see if anyone had noticed. The guys on the 13th tee seemed to be looking in another direction. But they might see so I was all for God’s sake get up woman! I said this between fits of laughter actually. I swear we weren’t drinking.

Back to the golf:

Back to my second shot. The flag was in the front right of the green so I’ve got like 50 yards to go. A great opportunity for par if not birdie! I hit my sand wedge really short, so I decided to try a nearly full sand wedge. At worst I’d be on the green, right. Perhaps the cart incident clouded my judgement, I never hit my sand wedge except in the sand and some chipping. The ball was sitting up quite nicely and I also tend to get underneath the ball with the sand wedge, but it still doesn’t register. I swung, slid the blade right under the ball, and it went basically straight up.

Third shot: Now I’m maybe 25 yards from the flag. Having learned my lesson with the sand wedge, I revert to the pitching wedge. And I blade it. Now I’m on the other side of the green which tilts away from me. My chip doesn’t stop and runs past the hole. I think. It was either that or I gave it too much respect. I really don’t remember except that I’m finally on the green. In four.

How is this happening?! Just let me get this putt down for a bogey. Three putts later I write a 7 down on the scorecard. For those keeping score that’s 6 strokes inside of 50 yards or so. I ordered Dave Pelz’s book when I got home

Lessons learned from yesterday’s round:

  • Proves the old adage, drive for show, putt for dough. My short game needs work.
  • Never play a shot you haven’t practiced / aren’t confident with in a round.
  • Play one shot at a time. I was too excited about the idea of a birdie on my second shot. And I was too upset at my second shot during shots three through seven. I also swore. A lot.
  • Try not to kill your partner with reckless cart driving. Or install seatbelts.
More on the Super Mario Room

First, the response and all the compliments have just blown me away. Thank you all so much. Second, my wife was a huge part of this. I couldn’t (wouldn’t) have done this without her help. I wanted to mention that because I’m seeing posts like this one at Curbed.

There have been some questions about how exactly we did this. The background colors were easy enough, 35″ of black along the bottom, an 8″ orange stripe, and blue above. We very nearly stopped there after realizing how much work we were in for, but once I figured out the stencil thing we decided we might actually be able to pull this off before our son was of, say, legal drinking age. To make the stencils, I used two sheets of clear 8.5″ x 11″ labels. 1/4″ per pixel gave me just enough room for 32 x 32 “pixels” on each sheet. I printed the various patterns on these sheets, stuck the sheet with the pattern on top of another and then cut the patterns out with an X-Acto knife. I also printed some guidelines on the sheets to help with alignment. Each sheet could be used maybe 50 times or so before they became too caked with paint and had to be thrown away.

In some cases patterns had to be broken into two templates to avoid ending up with just an outline. For example, for the clouds there was a top part and a separate sheet for the bottom part. For the ground, there were four templates. One for black horizontal-ish lines, another for vertical lines, and two others for the horizontal and vertical highlights. Other templates (like the bricks) left small gaps where I’d have to come back later and paint freehand… you know, perhaps this would make more sense if I made the template available: Mario Photoshop Template.

There were several mistakes. Some intentional. Some not. Someone actually noticed that I’d painted Mario’s shirt sleeves and boots blue instead of brown. I did that intentionally since my son finds that more recognizable. Also, Luigi wouldn’t normally be waiting for Mario on the other side of the castle, but Aaron likes Luigi and I had to put him somewhere.

As for the unintentional mistakes, the flagpole is too far right by 16 pixels. Sadly Mario could never manage 5,000 points on my map. I was going to correct it, but my wife told me I was crazy. The hill to the right of the castle is squished, and the one to the left is 1 pixel too wide. Other than that, I think it turned out pretty good.

This Year’s Stupid Idea

I really need to learn to think through these ideas I have before committing to them. Last year I had this built-in bookcase idea that I was going to knock together in a few weekends. The year before I was taking a picture every single day. Something equally nutty the year before that I”m sure. And now this year… well, you’ll see.

We’ve been slowly trying to fix up the house a bit at a time over the last year or so (remember the bookcase?) and when talking to my wife about what to do with my son’s room I blurted out something about a Super Mario Bros theme. I didn’t really think about it, except that it would be cool. There was a post on reddit awhile back showing someone who had done just that, and it looked pretty awesome. When the time came to actually paint his room, my wife reminded me of the Super Mario Bros idea and then I actually had to think about it. I seemed to recall ThinkGeek had some decals, so maybe I could use those, or maybe paint it. But first I’d need to figure out exactly scene I wanted to portray.

I really wanted to map World 1-1 of the original game onto the walls. Originally I thought I would take a small section and paint that on the walls from floor to ceiling. Turns out that wouldn’t work so well because most of the interesting bits are on the bottom where they would be concealed by the bed, desk, dresser, etc. Then I struck upon the idea of painting a border along the bottom so I could scale the scene down and fit more of it on the walls. I worked it out so each pixel would work out to 1/4″ square and my scene would be 232 (58″) pixels tall by about 2060 pixels wide (515″). Since the vast majority of it was sky, it surely wouldn’t be that much work, right?

Super Mario Bros. Room

So we got to work and quickly had our three background color painted: black on the bottom, an orangeish stripe along the middle that would be the ground, and the blue sky above. The next day we’d pencil in a grid and start painting pixels. I assumed that because reddit guy had penciled a grid across and entire wall that I would have an easier time since I didn’t have to fill the whole wall, just the bits I needed. Well that guy was working with a much simpler design and 1 inch pixels. It didn’t take long before I began to reconsider those decals.

Each $50 pack of ThinkGeek decals look to have about 8 of the ground blocks in them. If I figured right, I need about 170 blocks. Or about $1,100 worth of decals. Even then I probably wouldn’t be able to recreate my World 1-1 scene exactly. But what if I made my own decals? Maybe I could print my patterns on some clear labels and stick those on the walls? Even if the labels had been clear, the ink would have smeared unless I applied some sort of clear coat, so that idea was out. My next idea was to create masking templates using those same labels and go back to the painting idea.

It certainly wasn’t going to be very fast, but the template idea worked pretty well. There were several of set backs, and several areas had to be painted freehand, but after about 3 weeks of work, we finally finished the room. It has a ton of mistakes (that I won’t bother to point out), but all in all I think it turned out really well. Now if I can just avoid blurting out any more ridiculous ideas.